TCP (Ethernet)
A TCP connection is made via an Ethernet connection either directly into the Ardexa Device or into the same network as the Ardexa Device. It is the most reliable and simple communication method and is therefore the recommended communications interface to use if the machine has it. This section is for machines that communicate via TCP.
Part A: Select Preferred Connection Method
In order to physically connect your machine via TCP, there are several main options you can take. Keep in mind that this section is only showing connections where your machine is communicating via TCP. The first option is to connect it directly to the Ardexa Device.
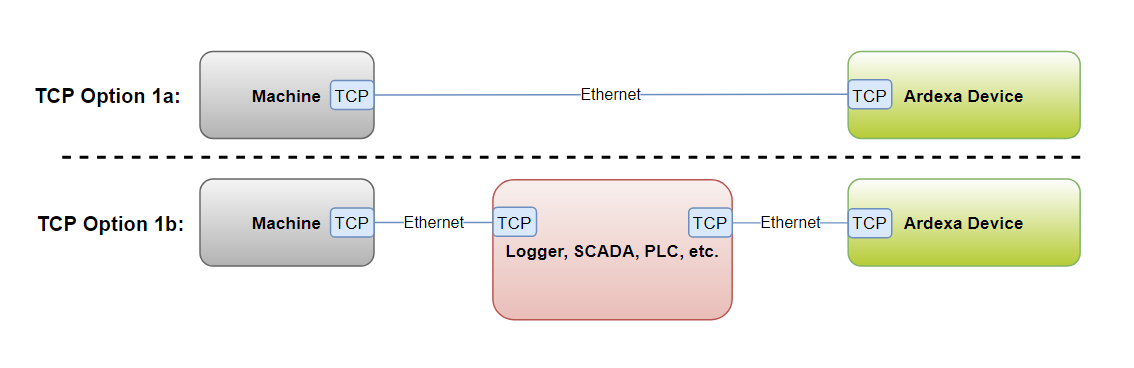
TCP Option 1: Direct Connections
The benefit of a direct connection is its simplicity. All that is required is an Ethernet cable connecting the machine straight to the Ardexa Device, or in the case of TCP Option 1b, to a logger, SCADA, PLC, etc., which is then connected to the Ardexa Device via Ethernet cable.
For TCP Option 1b (and other similar configurations below), the machine communicates to the Ardexa Device via a logger/SCADA/PLC/etc. This can be done on TCP, but also with a serial connection or any other proprietary communication protocol between the machine and the logger/SCADA/PLC/etc., and then TCP between that and the Ardexa Device. See the Serial section for more details on this configuration with a serial connection.
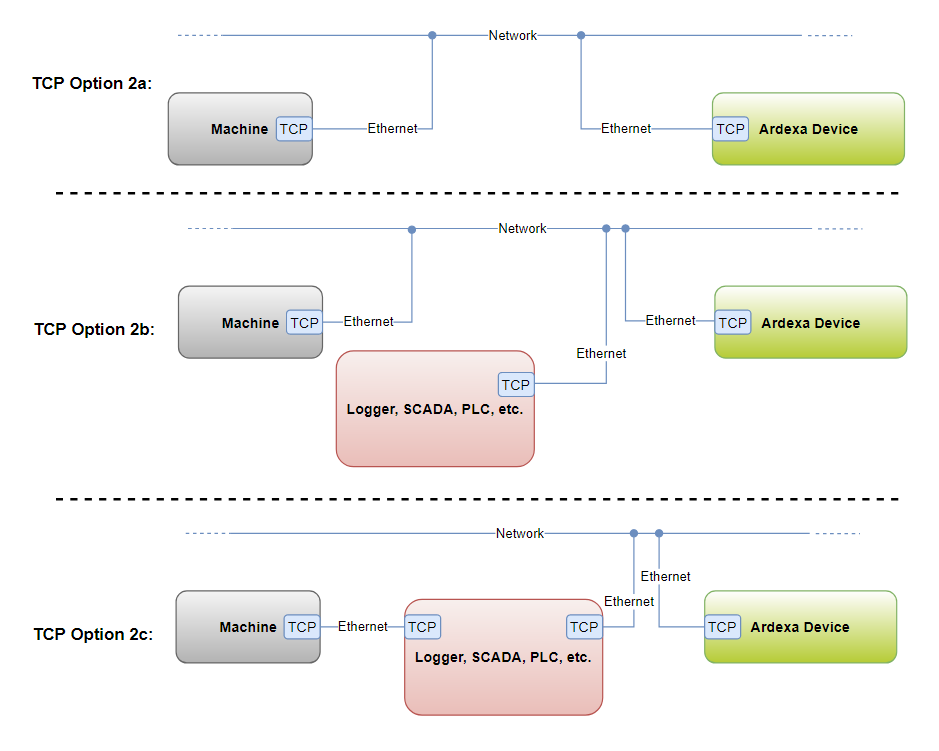
TCP Option 2: Simple Networked Connections
A networked connection entails connecting the machine via Ethernet cable to a router, switch, patch panel, etc. that is on the same network as the Ardexa Device. This is a more flexible and scalable solution that is well suited to installations where multiple machines are to be connected.
In all the diagrams for TCP Options 2 and 3, the "Network" or "Subnet" that the machines and the Ardexa Device connect to can be a variety of devices, such as a router, switch, patch panel, or gateway. It is assumed that the Network is connected to the Internet.
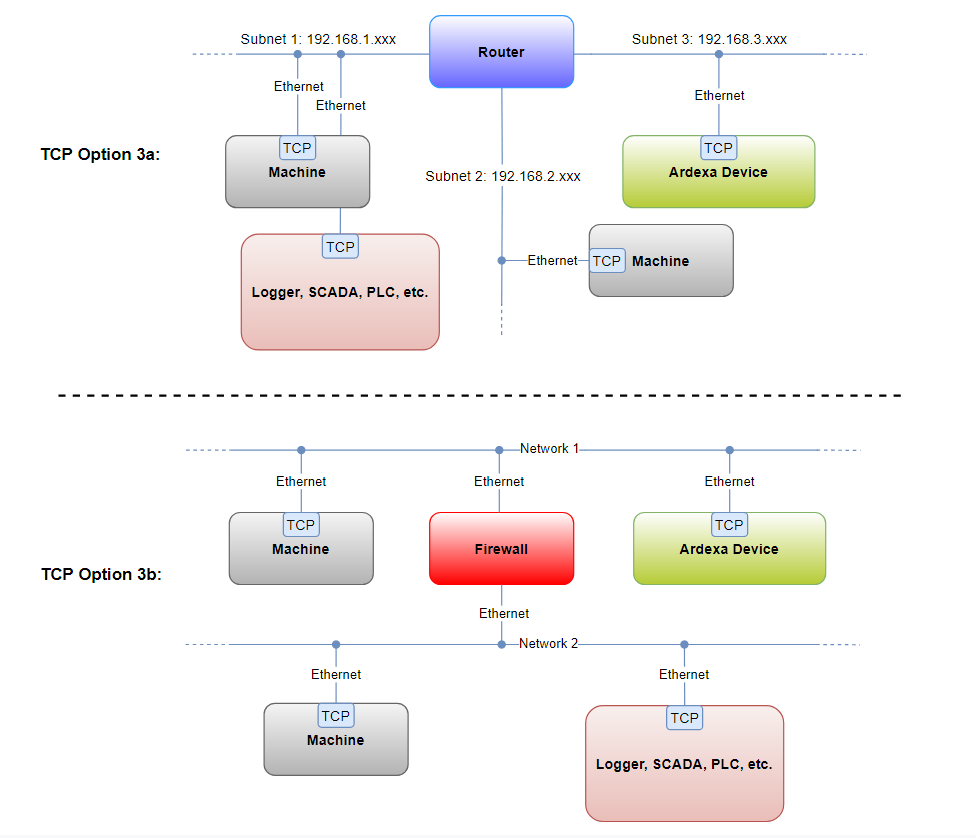
TCP Option 3: Complex Networked Connection
The configuration shown in TCP Option 3a contains a router that has split the network into three subnets. This is usually done for security and/or organisation purposes. If the Ardexa Device is on a different subnet than the machine it is connecting to, the router will have to be configured to connect their two subnets on whatever port is being used to sent data (e.g. 502 for Modbus TCP). If this is not done, the Ardexa Device will not be able to communicate with the machine.
The configuration shown in TCP Option 3b, on the other hand, is when there are two separate networks connected by a firewall. Similar to before, if the Ardexa Device is not on the same network as the machine that is being connected, some rules will have to be added to the firewall to allow the machine and the Ardexa Device to communicate. In general, a rule is required to allow the Ardexa Device access to the machine's IP address on the target port (e.g. 502 for Modbus TCP). Please consult a network administrator to configure the firewall to enable the required communication.
Part B: Identify Setup Parameters
Once the machine has been connected physically to the Ardexa Device, it is time to make sure it is configured properly so that it can be mapped into the Ardexa Cloud.
In all cases, a static IP address MUST be configured on the machine. This is very important as it ensures that the connection is stable as the address will not change as it would if it were set to DHCP. This can usually be done by manipulating the network settings of the machine, or on a web portal that communicates with it.
For practical reasons, we have grouped the most common protocols into the following five categories. In order to figure out what other settings need to be configured and what setup parameters must be sent to the person implementing the connections, please select the appropriate communication protocol category below for your machine(s):
pageStandard Industrial ProtocolspageOPC ProtocolspageDatabase ProtocolspagePLC ProtocolspageMiscellaneousLast updated