Using the Tunnel
Details and examples of tunnelling specific protocols and applications
Connecting via the Ardexa Remote Desktop Application
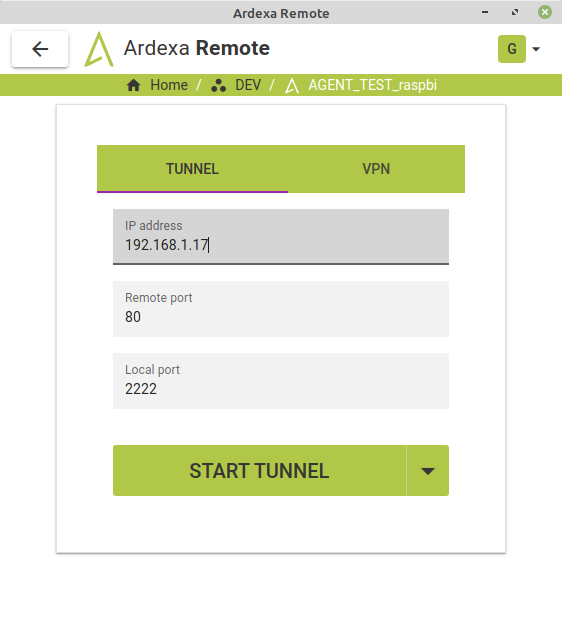
Ardexa Remote offers 2 types of access: a Tunnel access or a VPN access, from the client software. In computing, a "tunnel" is where a remote service or computer, that would otherwise not be accessible, is made available to a local network. A tunnel can be established either via the command line or the Ardexa Remote desktop application. In the figure below, the Ardexa Remote desktop application is being used to make a tunnel connection. In this case it is to a machine at IP address "192.168.1.17" and "Port 80" (web - http), which is located on the same network as the Ardexa edge device at the remote plant.
If the IP address is 127.0.0.1, this refers to the Ardexa edge device.
Once the "START TUNNEL" button is selected, the user can then navigate to the remote machine's Port 80 interface using a browser, as follows:
The Ardexa Tunnel works by connecting to an Ardexa Agent via the API and creating a "tunnel" between your local computer and the remote service. The tunnel is will take a remote port and make it available on your local machine as if the service was running on your local machine. Any requests to the local port and bundled up and sent over to the Ardexa encrypted network, and then the response is delivered back to the local port in the same way. In total, there are five critical pieces of information needed to make the tunnel work:
The agent you wish to tunnel through
Workgroup ID
Device ID
Details of the remote service
The IP address of the remote device
The service (TCP port) for which you need access
Where to open the tunnel on your local machine
The local port. This local port usually defaults to 2222 by the Ardexa Remote application. If you need something different, then enter it number as required
HTTPS: Be aware that when you use a browser to connect to a device that is on port 443 (https) you must connect using the prefix https, as follows: https://localhost:2222 If you connect as http://localhost:2222, without prefixing the URL with https, then the device might return as "Page Not Found". If this is successful you will then likely be presented with a certificate warning. Click to accept the certificate and continue to connect to the device.
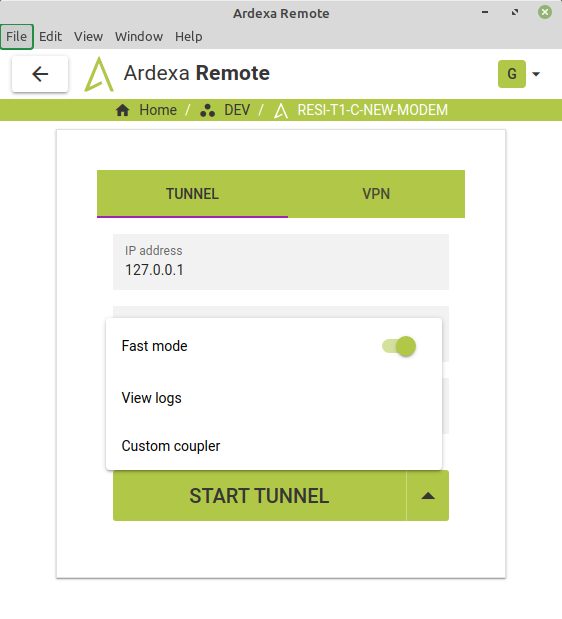
If you select the arrow next to the START TUNNEL button, you will see further options as shown below.
Fast mode. This uses a GeoIP to make the connection faster. If you find that you are getting errors in conenction, please turn this off and try again. On the command line this is equivalent to
-c reliableView logs. This is to view the connection logs. If there are problems, Ardexa may ask for a copy of these logs.
Custom coupler. This is to use a custom connection coupler. Ignore this unless otherwise directed by Ardexa.
Connecting via the Command Line
Ardexa Remote will also allow you to establish a tunnel from the command line. If you wish to do so, then log on the Ardexa cloud, navigate to the the following tab: MENU: > [DEVICES] > (select device) > [TUNNEL]and copy the command via the button COPY TO CLIPBOARD . Paste this command onto your Windows Powershell or Mac or Linux console or terminal window, and execute the command. It will prompt you to login with your userid/password, and 2-factor authentication if it is configured. These steps are then as follows:
Open the target Workgroup and browse to Devices
Select the target Device and open the TUNNEL tab
Enter the details of the Remote Service and the Local Port
The IP address of the remote machine you wish to connect to
127.0.0.1 if you want to connect to the Ardexa machine
Any IP address accessible from the remote machine. Please use the Discovery tools if you are unsure what's available on the remote network.
The port number you want to tunnel to on the remote machine (Remote Port)
Please see the Common Service Ports section below for a list of commonly used services and ports
The Local Port number that you want the client to listen on
if you wish to listen on a port below 1024, you will need Administrator/super user privileges
Open your command prompt and type or paste the ardexa-tunnel command. For example:
You will then be prompted to enter your login details for the Ardexa API. You will need to enter your Email address and Password to proceed, and the 2 factor authentication if this is configured for the workgroup. Once you are authenticated, there will be a short wait while the tunnel is established and then you will see the message "Connected". Your tunnel is now ready to use.
Connecting to Siemens S7 TIA Projects
When a Totally Integrated Automation project is being utilised the following procedure should be followed to connect your Ardexa tunnel:
Open the TIA Project
Open Services and stop the service S7 S7DOS Help Service (this service occupies port 102)
In the Ardexa App, configure the TUNNEL to use Local and Remote port 102
Start the tunnel with powershell (as Administrator)
Restart the S7 S7DOS Help Service
In TIA navigate to Online -> Extended online
NB. Extended online does not work with HMI panels. This is a limitation of the panel.
Choose PN/IE_
Double-click in the IP Address field and enter the value:
127.0.0.1
Connect to the SPS
(do work)
Go Offline must be clicked before closing the TUNNEL
Close TIA
Close TUNNEL
If you need to use multiple concurrent tunnels and are unable to alter the local port (e.g TIA Portal), you can tell the Ardexa Tunnel client to bind to a specific IP address. For example:
By binding each tunnel to a specific loopback address, you can connect as many tunnels as you need.
Common Service Ports & Examples
SSH: 22
HTTP: 80
HTTPS: 443
Using a TIA Project
Last updated