Install the Raspbian Image
This is a guide on how to load the Ardexa Raspbian image onto a Raspberry Pi and install the Ardexa agent. Ardexa has developed a version of Linux for ARM (Raspbian) and x86 that is extremely reliable for IoT environments, and/or situations requiring little or no supervision.
Ardexa Devices provided for our enterprise customers come pre-installed with the ArdexaLinux Image.
Preparation
The pre-requisites for these instructions are the following:
A Raspberry Pi and power supply
Micro SD Card - Minimum Requirements: Class 10 (C10) - 4Gb
A micro SD Card adapter (for the micro SD card)
An Ethernet network with Internet connectivity and a DHCP Server
The Ardexa Raspbian Image, supplied by Ardexa. Latest version is: image_ArdexaLinux_10.2.1_rpi.zip
The password for the Ardexa Raspbian image, also provided by Ardexa
Access to the Ardexa Cloud, and permissions that enable you to create a new Device
If you don't have these, contact Ardexa.
Download the Etcher application
Go to https://etcher.io and download the etcher application for your environment. This tool helps you install the Ardexa Raspbian image onto an SD card.
Install Ardexa Raspbian
Connect the SD Card reader to your workstation, and insert the microSD card, using the SD card adapter. An SD card adapter is a 'holder' for the micro SD card, as shown in this video: https://www.youtube.com/watch?v=pM3rLuvOr8s
Start the etcher application that was previously downloaded. Then follow these three steps:
Select the Ardexa Raspbian image,
Select the SD card; and then
Flash!
This will write the image to the SD card, and should take about 5 to 10 minutes.
Installing The Raspberry Pi on to the Network
Once the above has been done, then:
Insert the SD card in the Pi
Plug in an Ethernet cable (Assuming you have a DHCP server on your network)
Plug in the power to the Pi, mouse and keyboard, and a HDMI screen
The Ardexa Raspbian image has been designed to automatically connect to a network using DHCP. So when you see the login prompt, it should already have connected, so long as DHCP is available.
When prompted to login ("raspberrypi login:"), login using the credentials (case sensitive):
userid: ardexa
password: PROVIDED BY ARDEXA
UNO220 ONLY: Enable additional drivers
The UNO220 requires one additional step to enable all the features provided by the case/hat. Please run
This can be done from the console, or using REMOTE SHELL. Please reboot the machine after you have run this command.
Create a new device in the Ardexa Cloud
See Install for more information on installing the Ardexa Agent.
Go to the Devices page in the Ardexa Cloud
Click the New Device button
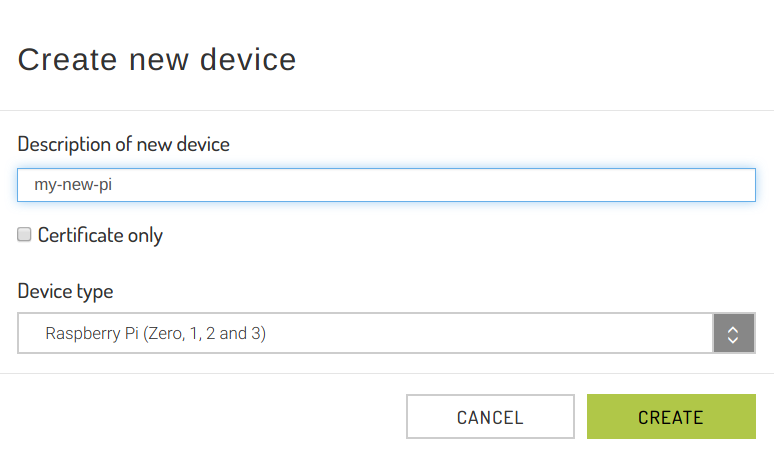
Enter a name for your new device. Set the Device type "Raspberry Pi (Zero, 1, 2 and 3)" (important):
Click Create. The agent pack will be downloaded by your browser. If you performed this step on another device, copy the agent pack to your Raspberry Pi using a USB device.
Run the following commands on the Raspberry Pi in the directory where the agent pack is located. Make sure to substitute the variable elements (${WORKGROUP_ID} etc) as each agent pack is unique to your workgroup and device.
Once this is done, the Raspberry Pi will connect to the Ardexa cloud.
Last updated